C Panel
Advanced DNS Zone Editor
Step. 1. Login to your Cpanel, and go to "Domains" section in the home page. In that click on 'Advanced DNS Zone Editor'
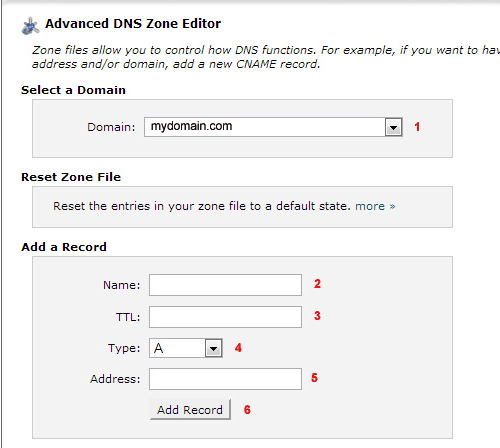
Step. 2. 'Advanced DNS Zone Editor' page appears. To add a record enter the required values as follows

- Select a domain from the drop-down menu.
- Type in the Name of the record.
- Type the record's time to live in the TTL text box. Time to live specifies how long a particular record should be kept in memory, in seconds, before it should be refreshed.
- Select a record type:
- A: An A record is the DNS record that is responsible for mapping hostnames to IP addresses. The A record is essential because it allows DNS servers to
identify and locate your website and its various services on the Internet. Without an A record, your visitors will not be able to access your website, FTP servers,
or email accounts.
Remember: A records should only be added when you add a service that is not provided by cPanel or your web host. - CNAME: CNAME record stands for "canonical name record." This record creates an alias, allowing a querying server to continue the DNS lookup under the new name.
- TXT: A TXT record is a text record that contains certain information that will be read by querying servers. These can carry useful data for the SPF or DKIM email authentication systems.
- A: An A record is the DNS record that is responsible for mapping hostnames to IP addresses. The A record is essential because it allows DNS servers to
identify and locate your website and its various services on the Internet. Without an A record, your visitors will not be able to access your website, FTP servers,
or email accounts.
- Type in the Address of the record.
- Click 'Add Record'.
Step. 3. Now the record is added to the 'Zone File Records'

Step. 4. Edit a record: Click Edit next to the record you wish to edit.

Step. 5. Change the Name (1), TTL(2), Type(3), or Address(4) as needed. Finally Click 'Edit Record' (5) to save your changes

Step. 6. Delete a record: Click Delete next to the record you wish to remove.

Step. 7. Click Delete to confirm that the record should be deleted

Related articles

 This feature will erase any modifications you have made to your zone records, either using the Advanced DNS Zone Editor or using the Simple DNS Zone Editor. It will attempt to save TXT entries. Before using this feature, be sure to write down any changes you may want to save.
To reset your DNS zone files to the defaults:
- Click the checkbox next to Are you sure you want to erase all entries and revert to the default state?
- Click Reset Zone File.


 Guest |