


 Guest |
 C Panel
Deny an IP address
Step. 1. Login to your Cpanel, and go to "Security" section in the home page. In that click on 'IP Deny Manager'
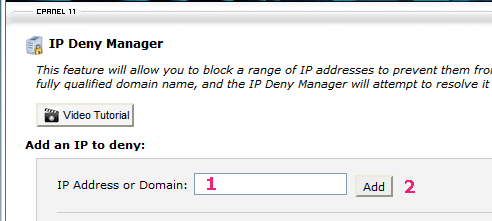
Step. 2. 'IP Deny Manager' page appears. Go to 'Add an IP to deny section', Enter the IP address or domain name in the text box (1) and then click 'Add' (2) button
Note: You can specify denied IP adresses in the following formats:
- Single IP Address : 10.5.3.333
- Range of IP Address: 10.5.3.3-10.5.3.40
- Implied Range :10.5.3.5-40
- CIDR Format: 10.5.3.3/32
- Implies 10.*.*.*: 10
- 10. as an implied IP address implies 10.*.*.*, where each * represents a positive whole number. If you enter 10., all IP addresses that begin with 10. will be blocked
- If you enter IP addresses directly to the .htaccess file, enter them in CIDR format only. Use of the range formats shown above as entries in the .htaccess file may cause problems.

Step. 4. Unban an IP address: To remove a denied IP address: Click the button in the Remove column for the appropriate IP address. Click Yes to confirm.

Related articles
 IP Deny Manager allows you to block access to your site for one or more IP addresses. You can also ban fully qualified domain names.