MailEnable
Read your Mail
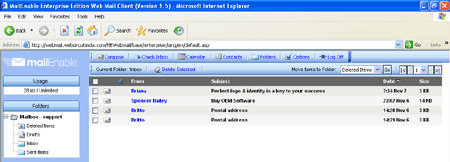
Step. I. Once you have logged in, you will reach the inbox (Webmail Message List Window). Otherwise you can reach this folder by clicking the Inbox folder icon in left pane.
This window will show you all email properties such as who the mail is From, Subject, the Date of delivery and the Size of the message. From here you can move a particular message or selection of messages to a Deleted Items folder. It is within this display section that you can also view what folder you are viewing, along with this you are able to move mail between folders and with folders containing large quantities of mail viewing page advancements can be achieved.
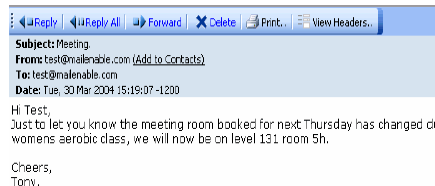
Step. II. When a mail message is clicked on the previous pane the Message List Window shows further details and the body of the message is displayed. From here you can Reply, Reply All, Forward or Delete a particular message.
All details of a message are displayed here including subject, sender's details, receivers address and the date and time of the message having been sent. This information is all displayed within the header and underneath this header is the actual written message. Within this screen you will also find whether a message contains an attachment.

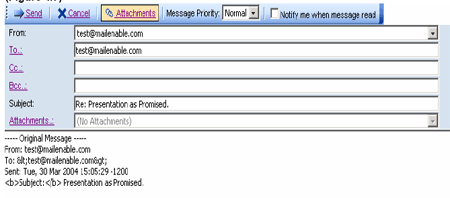
Step. III. Reply: To reply to a sender from here, click on the reply button on the toolbar and will invoke a reply message window that acts similar to a compose new message window but the address of the recipient and sender are automatically entered.

Step. IV. Reply all.: - The Reply all button is used when you want to reply to a message but the message was sent to several users and the reply is required to be sent to all original recipients these fields are again automatically entered.

Step. V. Forward:- When an email is received and the message is to be sent on to another email address the Forward button can be used this is similar to the reply buttons previously mentioned in that a new window containing the message that is desired to be sent is displayed. This time however the From: box is the only one automatically filled. From here you just enter a To: address of where you want to send the message and it??s details then the message will be sent along with any attachments.
Step. VI. Delete - If a message is required to be deleted into the deleted Items folder a left mouse click on the delete button will remove the file from the inbox and place it in the deleted items folder.
Step. VII. Print - You can print the message by clicking on the Print button of the toolbar.
Step. VIII. View Headers. - Click on the view Headers button for viewing headers of received message. This may be useful for finding the source of spams. Check our FAQ on Mail for more details.
Related articles


 Guest |