MailEnable
Compose a Message
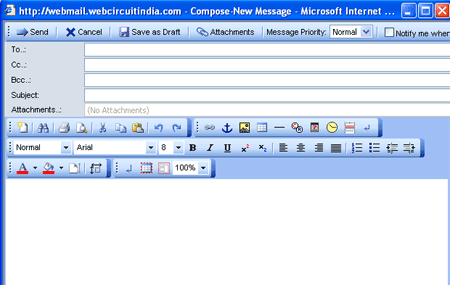
Step. I. To compose a new email you firstly click yonto the compose button of the mail tollbar.Step. II. Upon clicking this button a new Compose-New Message window will open

- The From: combo box as shown here is simply a way to select the
email address that is wanted to be sent from. This address will show up
at a recipients inbox as a senders address. This email address can be
changed if there is several email addresses configured for a user inbox,
to select simply left click your mouse on the combo box drop down arrow
and then select (or left click) the address you want to send from.
- The To: combo box is where an email address in entered for
the destination of a sent email. It is important that the address is
correctly typed as one incorrect keystroke of a letter or number in
this combo box will ensure an email does not reach it's destination.
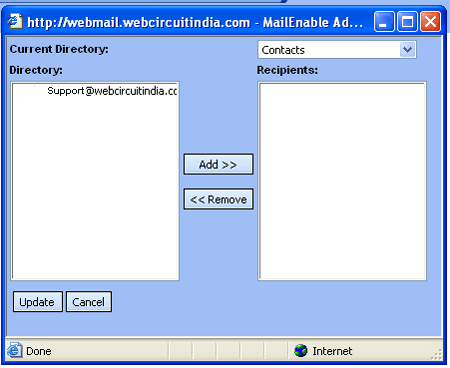
To select an email address from an address book all that is required
is a left click on the To: label. (see the Step. III)
- The Cc: combo box has the same functionality as the To: combo
box in that any email address entered here will receive the email message
along with any attachments (attachments will be covered later in the manual).
Cc: is an abbreviation of Carbon Copy and in
business terms is usually equated to For Your Inclusion or For Your Perusal.
- The Bcc: combo box has the same functionality as the Cc: combo
box and any address entered here will again receive the message.
The fundamental difference between the two Cc: and Bcc: is any recipient of a message in the To: and Cc: combo boxes will not know the Bcc: address has received the email message. To further elaborate on this, Bcc: is an abbreviation of Blind Carbon Copy and when a person receives a message from the Bcc: box they can see all other people that received the message however no other recipient except for the sender knows that the email addresses in the Bcc: box have received the email.
- The Subject: message box is where a short description of what
the message to be sent is about or what it contains.
- The Attachments: combo box is where a short description of what the message to be sent is about or what it contains. From here after clicking as with previous message boxes a further screen will appear as below where you can browse your computer in a standard windows explorer window for files to attach (one at a time). See the Tutorial 'Attaching Files.'
From here you left click on a name of the person an email is to be sent and then left click on the Add button. When the Add button has been clicked and an email selected the address will show in the right hand panel. This process as described above can be repeated as many times as required so as to add several receivers of the one email message.

Step. IV. Email Send/Arrival Options : There are email sending or delivery options displayed after the compose button has been pressed.
- Send : When you are ready for an email to be sent click on
the send button and the email will be delivered. Cancel: A click on
this button will clear all that is currently being created and return
back to the Inbox, there is no way to return back to message you were
working on so be careful when using the Cancel button.
- Attachments: This button will allow the user to enter the attachment
screen and enable organization, addition and deletion of attachments.
- Message Priority: This is where a message priority tag can
be set, this setting is displayed to a recipient and allows them to
know the importance you the sender place on them reading the email.The
choices available for these tags are Low, Normal and High.
- Notify me: When you place a tick in the box by clicking in it as below An email will be auto replied when a recipient reads the message. Please note that the recipient is able to prevent this from happening, if they have their client verify whether to send notification.
Related articles


 Guest |